Showing posts with label recipe. Show all posts

Monday, March 10, 2014

Recipe: Easy Eggdrop Soup


My poor husband, who shall remain nameless, is miserably sick right now with a nasty sinus infection.  So soup happened.

Eggdrop soup has always been one of my favorites.  As a kid, it was as ubiquitous and necessary a dish at a Chinese buffet as the fortune cookie, or those ridiculous little fried doughnut-ball things that were covered in sugar (you know the ones).  Turns out eggdrop soup is like...the second easiest soup in the entire world to make.  Second only to warmed up clear broth.

So here's what ya do!

Easy Eggdrop Soup (as opposed to the difficult kind, which does not exist)

Prep time:  stupid quick
Cook time:  stupid quick
Serves:  this is enough to make 2 huge bowls, or 4 small bowls, of soup

Ingredients

  • 6 cups chicken stock
  • 6 eggs
  • 2 Tbsp white pepper
  • 2 Tbsp soy sauce
  • 1 dash five spice powder (not too much)
  • 1 slice fresh ginger
Method

  • Dump the stock into a pot, and add all other ingredients except the eggs.
  • Bring the stock to a boil.  While it's heating, beat eggs lightly in a separate bowl.
  • Once the stock is boiling, reduce to a simmer.
  • Slowly pour in the eggs, stirring constantly.  The eggs will feather out and cook all whispy-like.

Tips and Variations

  • Paleoize it:  Soy sauce contains gluten and (obviously) soy.  Substitute coconut aminos for the soy sauce for a squeaky-clean paleo version.  Or for a gluten-free (but still soy-full) version, use tamari.
  • If I really loved my nameless husband, I'd have snipped some fresh scallions over our bowls of soup.  But, well...you know how it is.
  • You can really use any stock you have on hand.  Chicken stock will give you the classic clear broth, but full disclosure:  I used homemade goose stock here.
  • Serve with hot tea - oolong tea is the traditional choice for the classic Chinese-buffet experience.  For the sickie, I made Pink Pepper Chai from Savoy Tea Co.  And for myself - Lapsang Souchong from The Tao of Tea.  This last tea hails from Wuyi, China, so it was definitely the most authentically Chinese thing on our table tonight.

Saturday, February 8, 2014

Sasha's Top 10: Valentine's Day Roundup


Valentine's Day is less than a week away, and boy I've been surfing Pinterest like I have a room full of baby furniture that I don't want to assemble!  Or something.

Anyway, I'll be the first to admit, there's a lot about Valentine's Day that makes me gag.  I don't go in for artificial sugar, y'know?  Food coloring, heart vomit and sparkly, glittery, "LOOKIT HOW IN LURVE WE ARE, SHNOOPY SHNOOPY!" are really not my thing.  That said, it can be a fun excuse to show a certain someone or someones in your life how much they mean to you - said someones to include significant others, children, good friends, cats or even thy sweet self.  Also chocolate.  There is SO MUCH CHOCOLATE lying around this time of year, and that can only be a good thing.

So I've compiled a collection of Valentine's Day ideas that I actually quite enjoy.  I think there's something for everyone here, so I hope that no matter who you are or who you're with, you'll find something you can enjoy here.


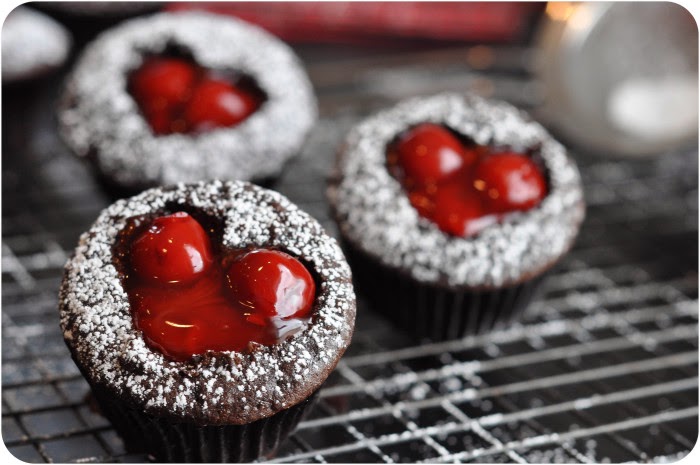
These decadent cupcakes are perfect for you, your sweetie or your best friend.  They're impressive to look at, easy to make, and Lemon Sugar lays out the whole recipe for you.


Step-by-step instructions on how to create your own edible chocolate cups, to fill with whatever kind of berries or deliciousness you want, really.  Or you could spend lots of money for the same thing at Godiva.  I vote handmade, of course!


If, like me, you're actually capable of getting sick of all the ooey-gooey sugary crap you have to wade through this time of year, this simple technique will be just the thing!  Easy, and healthy and bite-sized!  The darker the chocolate you use, the more anti-oxidants you get, you know.


An easy, personalized gift - perfect if you have kids, or are in a polyamorous group relationship.


Oh man, I would TOTALLY have my husband, who shall remain nameless, wake up to this on Valentine's Day!  If Valentine's Day weren't on a workday this year.  Instead, I think I shall blunder around trying to put clothes on right-side-out before the sun rises and save this for another year (and the idea for another holiday!)


No really, you have GOT to check out this guy's Etsy shop.  There are many more cards where these came from, each one as geeky and great as the last!  I don't care what you think of Valentine's Day, if Yoda Cupid and Heart-Throb Lando don't make you smile, then man...I can't help you.


I love these printables.  Lovelovelove them!  They're cute without being cutsey, they're literary and they really mean something.  If you don't know how to express your love, you can't go wrong letting the bard do it for you, with these free printables.


Another quick, healthy snack that still gets the "look, we're going for pink things that are vaguely heart shaped and sweet" thing across.


I love this wreath, because it fits the theme with a nod to the lingering winter.  


These free printable cards say things like "You are pretty much my favorite husband," and "You're the one I want to be next to when you're on your computer and I'm on mine."  They're awesome cuz they're true!

Thursday, February 6, 2014

Recipe: SUGARY SUGARY BUTTERCREAM!!!

Buttercream frosting recipe


Now I'm not saying I'm above eating cake frosting with a spoon out of the can, but let's face it:  making your own buttercream is the way to go if you've got a few extra minutes (which you do while your cupcakes are baking).  It is stupid simple, all natural and ridonkulously tasty.  Here's the recipe I use.

SUGARY SUGARY BUTTERCREAM

Ingredients:
  • 1.5 cups (3 sticks) butter
  • 3 cups powdered sugar
  • 2 tsp vanilla extract
Method:
  • Beat the butter with an electric mixer until light and fluffy.
  • Sift the sugar over the butter and mix together.  Start on low speed so you don't poof a cloud of sugar right into your face, and then increase to full speed.
  • When combined, your buttercream should be frosty and spreadable.  If your icing is more crumbly than spreadable, add more butter 1 tbsp at a time until you reach the right consistency.  If your buttercream is still buttery and slippery, sift more sugar into the bowl, 1/8 cup at a time, until it looks how it's supposed to.
  • Splash in the vanilla extract and mix everything up well.
Tips and Variations:
  • Your buttercream will be the color of whatever butter you used - likely the yellower the better.  It takes coloring well, though.
  • For some color and added flavor, try adding pureed strawberries, raspberries or blueberries.
  • For still more flavor (but not necessarily much in the way of noticeable color), try adding some mashed banana or banana extract.
  • A small amount of beet juice will get you a nice, vibrant red or pink without actually tasking of beets.
  • A small amount of tumeric will get you a nice yellow color without actually tasting of Indian food.
  • For April Fools cupcakes, dump in the tumeric and add some curry powder.  MUAHAHAHAHAHA!!!
Basic Non-Ugly Icing Technique:
I am not a professional cake decorator, and I do not have children who require Martha Stewart-level birthday confections.  I do not own a piping bag, and if I did I wouldn't know what to do with it (ALL those NOZZLES!).  But here's a cheap and basic way to ice cupcakes that comes out a bit more polished-looking than haphazard slathering.  I also used this technique to create the dots around the base of this cake.
  • Let your cupcakes cool completely before icing, or your buttercream will become a melty, runny mess (or at the very least, be hard to spread evenly).
  • Transfer buttercream into a ziplock bag and snip a tiny bit off of one corner.
  • Squeeze the buttercream out onto the top of each cupcake in a spiral pattern.  If you work from the outside in, you'll be able to form a nice peak in the center.
  • You can leave the spiral pattern as-is.  This will also give you a good, even base if you're inclined to smooth everything down with a butter knife.

Wednesday, July 15, 2009

The Best Bread


Here's the bread recipe I've been promising you. Since discovering the idea of no-knead bread, I literally have not bought bread from the store. For months, I have enjoyed a steady supply of fresh, healthy, home-made bread. The secret is making a large quantity of dough that keeps for up to two weeks in your fridge. When you need more bread, you break off a hunk of dough, let it sit for an hour and a half, and then pop it in the oven. That's it. No kneading, no carefully timed rises. It's brainless, and involves about 5 minutes of actual work per loaf.

And it's GOOD! Crusty with a nice, moist crumb, this bread has the tiniest hint of tang, reminiscent of sourdough (though it's not a sourdough). The addition of wheat bran and germ round off that tang and make it a little bit rustic. I've looked and not found a recipe that works like this that involves whole wheat flour, so for now the bran and germ make it healthier than white bread. Well, that and the complete lack of additives of any kind. Unless you...like...wanted to add them...for some reason...then you could.

Here is the recipe. Try it and marvel at how insanely easy (and cheap!) it is to have fresh, crusty artisan bread on hand at all times.
Makes dough for three loaves
1 1/2 Tbsp yeast
1 1/2 Tbsp salt
3.5 cups warm water
1/2 cup wheat bran
1/4 cup wheat germ
6 cups all purpose flour

  1. In a large bowl, mix together the yeast and salt.
  2. Add the water.
  3. Mix in the wheat bran and germ.
  4. Add the flour, mixing thoroughly until all lumps are gone. This is most easily done 2 cups at a time, stirring between each addition. The dough will be quite wet and sticky, and not entirely smooth, but there should be no pockets of dry flour when the mixing is done.
  5. Cover, but not with an airtight lid, and let sit for at least 2 hours and as many as five.
  6. Bake now, or store dough in the refrigerator for up to 2 weeks.
  7. When ready to bake, break off 1/3 of the dough (per loaf), and place in a greased and floured bowl (a cereal bowl will do fine).
  8. Sprinkle liberally with flour, and let sit for about an hour (up to two, if dough has been refrigerated). It's ok to be very approximate with this time.
  9. Preheat oven to 450 degrees Fahrenheit.
  10. Let bread stone warm to temperature as oven preheats.
  11. Carefully transfer the dough from the bowl to the hot stone. The dough will still be very loose, but arrange in a nice, round mound. Slash the top three times with a sharp knife (this will be easier the more flour you dusted it with earlier).
  12. Bake for 35 minutes, or until bread sounds hollow when thumped.
  13. Cool on a wire rack until it's just cool enough not to burn you.
  14. Slather with butter and devour while still warm.
Hints and Variations:
  • This is a great recipe to add stuff into. Nuts, seeds, garlic, olives, mushrooms, cheese, dried fruit, diamonds...mix it in before you start adding the flour, maybe a handful per loaf.
  • This bread can also be baked on a cookie sheet or in a greased loaf pan, but the baking stone really enhances the crust and the shape of the loaf.
  • On a related note, these would probably make great dinner rolls. One slash on the top, maybe brushed with an egg wash. They'd need to be baked for a shorter time than a full loaf. I shall experiment and report back!
  • When you're done stuffing your face, wrap the still-warm loaf in a cloth napkin until fully cool, then store in a zip bag. The warm bread will not become stale as it cools, even overnight, but it will become soggy if it cools in anything airtight.

Tuesday, July 14, 2009

Vive la France!

And now, a few useful formulae:

scone + strawberry jam + whipped cream + strawberries = strawberry shortcake

scone + blueberry jam + whipped cream + blueberries = blueberry shortcake

scone + strawberry jam + whipped cream + blueberries = BASTILLE DAY SHORTCAKE!!!

Thursday, July 2, 2009

The Tastiest Palindrome


Haaaaallaaaaah.......
(In the interest of full disclosure, I normally spell it "challah." That's when I'm not trying to capitalize on its being a palindrome, of course).

Today, I am drowning in grainy goodness (I should go get a nice Heffeweisen and round things off). I've finished a hat (matching mitts to come) named after Ceres, the Roman goddess of grain and agriculture. Doesn't it remind you of woven grass? It reminds me of woven grass. Anyway. It's being tested now, and in celebration, I've decided to bake challah, and share the recipe with the masses!

Challah is rather more involved than most bread, and certainly more involved than the delightfully simple no-knead bread that I've very nearly perfected (about which more later). It has more than your typical 2 rises, it must rise in a warm oven and bake at a gradually increasing temperature.

Although I've had great luck baking Challah in a variety of shapes, it is traditionally baked in a nice, braided loaf. Furthermore, my recipe makes four loaves. That's a lotta baking! My understanding is that this is traditionally baked in quantity before the sun sets on Friday, so that there's plenty of challah to break off (not cut) and eat during the period of work-restriction during Shabbat. I could be wrong - I'm not Jewish. I just really like challah!

Today I'm quartering the recipe, and the recipe I'll share with you includes both measurements - numbers not in parentheses are for one loaf, numbers in parentheses are for four. I'll let you figure out the twos and threes and eights as you see fit. :-)

  • 2-1/2 cups unbleached all-purpose flour, more for dusting and adding in if the dough is too wet (10 cups)
  • 1-1/2 tsp. salt (2 Tbsp.)
  • 1/8 cup sugar (1/2 cup)
  • 2 level Tbsp. yeast (2 heaping Tbsp.)
  • 1/8 lb. butter, melted (1/2 lb.)
  • 1/2 cup + 2 Tbsp. warm water (2-1/2 cups)
  • 2 eggs at room temperature (6 eggs)
  • optional: seeds or dried fruit, about 1 handful total per loaf

1. Preheat oven to warm -- 140 deg. F.

2. Mix the flour and salt in a large nonmetal bowl, making a well in the center. (I tried it once in a metal bowl. The bread started to bake prematurely along the bottom during the rise. This may have been due to a sketchy Russian oven, or it may have been due to an overly conductive bowl. I'm not taking any more chances!)

3. Many people add seeds or dried fruit to their challah. I usually make mine plain, but on special occasions, I'll mix in sunflower seeds and golden raisins. Mix about a handful of your chosen stuff in with the dry ingredients now, if desired.

4. Add 1 Tbsp. (1/4 cup) sugar to the well, cover with the yeast, and top with remaining sugar.

5. Mix the yeast with the sugar in the well.

6. Combine the melted butter and warm water, mixing as best you can.

7. Add the butter mixture to the yeast mixture and work in well with your hands.

8. Separate 1 egg.

9. Add the remaining 1 egg (5 eggs) and white of the separated egg individually to the bread dough, kneading well afer each addition, until all the flour is absorbed, about 10 minutes. As you knead, you may have to add more flour, so have some handy. The dough will be sticky - add flour gradually until it doesn't stick hopelessly to your fingers.

10. Cover the bowl first with waxed paper smeared with butter, then with a towel, and put in the warm oven for 1/2 hour.

11. When the dough has almost doubled in size, punch it down and knead thoroughly and briskly for about 10 minutes. You will soon find that kneading warm bread dough is one of the more pleasurable activities life has to offer.

12. Cover with the greased paper and towel and let rise for 15-20 minutes more in the warm oven, until it is almost doubled again.

13. Remove once more, punch down, knead again for 5-10 minutes. Re-cover and let rise once more for 15-20 minutes in the warm oven.

14. Turn the dough onto a pastry board and knead thoroughly. (If baking 4 loaves, cut the dough into 4 equal pieces using a sharp knife.) Divide each loaf further into 6 pieces. Add a little flour, and knead each portion, and shape it into a ball. Cover the pieces not being worked on with a moist paper towel.

15. With the palm of your hand, roll out the balls into long ropes about 9 inches in length. Continue until all 6 balls are shaped into ropes.

16. Place 6 ropes side by side, touching at one end. Pinch that end to seal well. Bring the extreme right rope over the next three; then bring the extreme left over three. Continue until the bread is completely braided. when no more can be braided, pinch the ends to seal together. Place on a greased and floured cookie sheet. Repeat for as many loaves as you are making.

17. Brush with the remaining egg yolk, making sure you get into all the cracks.

18. Place in warm oven for 20 minutes.

19. Raise the oven temperature to 200 deg. F for 15 minutes.

20. Raise it to 275 deg F for 15 minutes.

21. Finally, raise the oven temperature to 375 deg. F for 10-15 minutes, until the bread is golden brown.

22. Let cool completely before slicing. If you really can't wait and want warm bread, let it cool enough to handle without burning yourself, and break chunks off. Bread really does slice better when it's cooled a bit, but this bread lends itself well to not being sliced.

23. The baked challah freezes well.

Saturday, May 9, 2009

Lunch from the Farmers' Market


The farmers' market by my house is open again! Rejoice! It's still a bit early in the season for selection and prices to be at their best, but it's good enough for me for now. I'm basking in produce (and cheese. Cheesecheesecheesecheesecheese. God bless Wisconsin). :-)

After we got home from the market, I whipped this up for lunch to go with last night's steak leftovers. It's so quick, easy and good, I thought I'd share the recipe. This is best with really fresh mozzarella, but the local provonello we found today was great.

Tomato and Cucumber Salad

1 medium cucumber
1 medium tomato
a few generous slices of provonello
2 Tbsp balsamic vinegar
2 Tbsp extra virgin olive oil
2 Tbsp chopped fresh mint
a dab of mustard
a pinch of salt
a couple of twists of a pepper grinder

  1. In a small tupperware, combine the vinegar, olive oil, mustard, salt, pepper and half the mint.
  2. Close up the tupperware. Shake. Lots. Let it sit there for a few minutes, while you prepare the vegetables, or longer.
  3. Slice the tomatoes, cucumbers and cheese and arrange on a plate.
  4. Drizzle the vinaigrette over the vegetables and cheese.
  5. Just before serving, sprinkle the remaining mint over everything. This lets part of the mint flavor the vinaigrette while part of it remains fresh and crisp.

Tuesday, March 17, 2009

I'm back!

You, of course, did not realize I'd left. I had not mentioned it. But I did leave. And now I have returned.

My boyfriend, who shall remain nameless, and I spent the weekend in Muncie, visiting my grandmother. We met my father and brother there and had a wonderful time. I love getting to spend time with my family. It's relaxing, like a deep, intellectual sigh, and I love how my boyfriend, who shall remain nameless, fits into the mix. I am often reminded that some people dread spending time with their families, or enjoy the company of their families as long as it's kept to small doses. I feel very lucky to have such good people in my family. I can't spend enough time with them and would be satisfied to turn out like any of them later in my life - even the wackiest, most idiosyncratic of them is a really good person.

We stayed at the McDowell-Nearing House, and if you're ever in Muncie, I highly recommend you stay there. The proprietor, Jane, is very friendly and an excellent cook! Her breakfasts were much heartier than I'm used to...in a good way...and absolutley delicious! Breakfast on our first day was a slice of pound cake, fresh fruit, a breakfast casserole, cheesy grits and this baked apple...sausage....thing....God, it was good. Plus, of course, coffee and various types of juice and tea. After 3 mornings of this, my body was begging me for a salad, but I said, "NO!!! This stuff is GOOD!!!" My brother had to leave at the crack of dawn this morning with no time for breakfast, so she left him some cake and yogurt in the fridge. The rooms were spacious and comfortable. I have nothing but glowing, wonderful things to say about this place!

Brought some knitting along, didn't get much done. I guess I did, but it's a long, thin thing, so progress isn't really the spectacular kind. No, you don't get pictures yet. :-P For my upcoming birthday, my boyfriend, who shall remain nameless, got me a bread stone! With it, I made this. I'm getting seriously into baking bread. I've discovered the world of no-knead bread, in which one can have bread-dough ready to rise and bake on hand in the fridge at all times. You can find a basic recipe here (adapted by the New York Times from Artisan Bread in Five Minutes a Day, by Jeff Hertzberg and Zoë François).

In other news, I returned home to discover three things. 1) I did not get a fellowship for next year, which is ok because I need to teach at some point anyway. 2) A good friend of mine got tenure. w00t!!! 3) Another good friend of mine from undergrad was accepted to the department of design studies here at UW Madison. This means not only will I have a good friend with whom I go way back living here in town, it means my friend is TOTALLY GETTING A PH.D. IN KNITTING, I AM NOT EVEN KIDDING, PEOPLE!!! Yes, you heard right. Ph.D. In knitting. HOW COOL IS THAT???